Sunday, November 25, 2018

Templates in Sitecore

Hi friends, in this post we will see about templates in sitecore.

Let's Go,

Everything in Sitecore is an item. The same is true for templates.

Every piece of content(Pages or Components) in a sitecore needs a template to define what it is.
A template in Sitecore is an item,
  •  Which defines the type of item to be created.
  •   Determines the field sections,field names,and field types that make up an item.

All Content is based on Items. 


Steps to create a new template


Step 1: Right click Sitecore/Templates/ and create new template folders that contains all your templates that make up your site.


Step 2: Click on the folder and select the Base Template(Template that contains common fields which is shared across all the templates.by default all templates inherited from standard template) ,create a new template .


Step 3: Now the templates has been created.please make a note before creating templates you need to prepare a list of sections and fields involved.


Note : Field with the same section name results merged section and same field name duplicated.

DataSource- Here you can provide Data Source for the Field

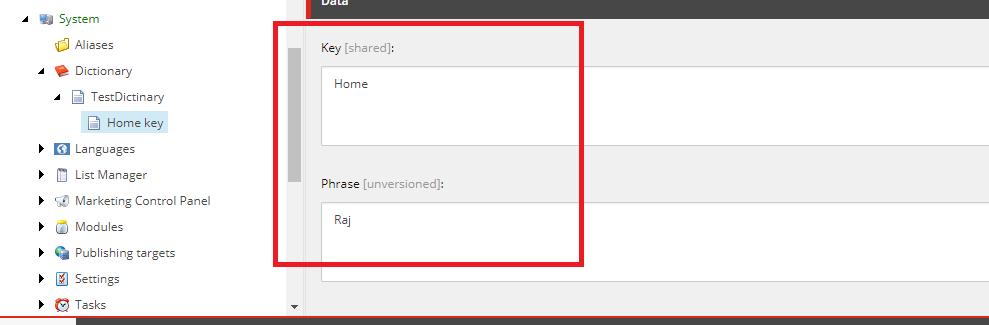
Unversioned vs. Shared

A field in a template can be defined as Unversioned or Shared. The Unversioned field has the same value across all the versions within the language. The Shared field always has one valid value for all versions in all languages.


Difference between OOPS and Sitecore

(i) Object  => Item
(ii) Class => Template
(iii) Attribute => Field


Difference between Class and Templates

 (i) Data Types => Field Types
 (ii) Any number of instances can be created based on a class, similarly we can create any number of I items based on a Single Template.
 (iii)Inheritance is also available in templates.

To find the template that your item is based on? Answer is QuickInfo section.


Standard Field Values:

In Sitecore we can provide default values to fields via two ways,
                           1. Static.
                           2. Tokens-Replace token with values at the time of Item Creation.
   Some tokens:
$name => The name for the new item entered by the user.
$id => The ID of the newly created Item.
$Parentid => The ID of the parent of the new item.
$date => The system date in yyyyMMdd format.
$time => HHmmss Format.
$now => The system date and time in yyyyMMddTHHmmss format.


Types of Templates

Sitecore have three types
1.Data Template-Data Templates are the Schema for the sitecore content. Sitecore associates a                                          data template with each item.
2.Branch Template-allows you to create set of items rather that a single item at a time.
3.Command Template- defines a class and method to be called during an insert operation. whenever we try to crate an item from this template, it associate a class  would be executed.


Recommanded practices when creating a template:

1.Provide user friendly name.
2.Set Icon.
3.Limit use of rich text editor.
4.Provide default values.
5.Avoid duplicate names.
6.Use inheritance whenever possible.


 That' all. please share this with your friends. Happy Coding :)

Workflows in sitecore and Content approval using Workflows

Hi All, welcome back, In this post we will see about workflows in sitecore and content approval using workflows.

Let's Move,
  • Workflows are used to restrict your content author to create right items for your sites.
  • Basically workflow is a series of steps that an item version goes through from it’s creation to it’s publication.


It has three basic parts

1. States

  • The basic building blocks of the workflow. The workflow states represent the different stages in your content creation process.
  • State must have(One initial State and one or final states)

2. Commands

  •  Transition of content items from one workflow state to another that is defined in the command item.

3. Actions

  •  An automatic side-effect of a command or entering a site. 


Example of content approval using Workflows and mail the details: 


Step 1: Create a Workflow from a path /sitecore/system/Workflows/ and name this as TestWorkflow.


Step 2: Create three states named as Initial,Editing and Approved.


Step 3: Create a one command under initial state named as Created
            And create two commands named Approved,Reject Under Editing
 Copy the auto publish item to Approved state from the example workflow


Click the TestWokflow and provide initial state to Inital state field
For ex.


And also click the created command item and set next state to Editing and click the approved command item and set next state to Approved ,and in the reject command item set Inital state in the next state field.
For ex.


Click the Approved state and check the mark as final field(this the last state that your item goes).


Create a mail Template based on a Template Sitecore/Templates/System/workflow/Email action in the Approved state.

Step 4: fill the necessary fields that you want and put your custom class path that have logic to send mail in the Type field


Step 5: In the class,using WorkflowPipelineArgs, I have rendered all fields and sent mail to provided email.


Step 6: Create a template named as test, Create standard values for that template,and assign your workflow in the default workflow field from workflows tab(Don’t forget to enable Standard fields in the view tab.because it enables workflow options in the the standard values item)


Step 7: Create a item based on the template and check above the qucik info section(Item is not published because it is not in workflow state)

Step 8: To move your item to the next state
on the Review tab,find your command(created) ,clicking on this ,will move this item to next state.After final state is reached the item is auto published(because we included the auto publish item at final state and mail sent to the provided mail in the mail action item)


Advantages of workflows:

1.Acquire content approval
2.Prevent unwanted publishing

All now set,Please share with your friends Happy coding :)

Sitecore Publishing Process

Hi All, In this post we will see about how items are published in sitecore.

Let's Go,

  • When you work in Sitecore, the items you save are saved to the Master database.
  • When you publish new items or updated items, the items are copied from the Master database to a publishing target

The default publishing target in Sitecore is the Web database.

Types of publishing:


1.Site Publishing publishes your entire website starting from the root of the content tree.

2.Item Publishingpublishes the item you select in either the Content Editor or the Experience Editor. The item can only be published if all its ancestors have been published.

Publishing Methods

1.Incremental publish:

  1.  Maintains a publishing queue.
  2.  Items added to the queue when changes made to this.
  3.  Publishes item only from the publishing queue.

2.Republish:

  1.  This publish will simply publish the each item again even if it’s published before.
  2.  Slowest.

3.Smart publish:

  1.  It compares each item with target database,if changes made,it publishes.
  2.  Comparing all items in the database makes time consuming.


Note:
Incremental Publish is only available when you publish the entire website


When you are ready to publish your website, you can run the publishing wizard.It provides guidelines to publish your site.
You can run the publishing wizard from the Content Editor and the Sitecore Desktop.


Steps to Publish a website:


Step 1: Open the Publish Site wizard from one of two locations in Sitecore:
           A. Content Editor – on the Publish tab, in the Publish group, click the Publish drop-down arrow, and select Publish site.


B. From the Sitecore Desktop => Start => click Publish site


Step 2: Choose one of the publishing method and publish your Items.


Please don’t forget to share with your friends. Happy Coding :)

Packages and Modules in Sitecore


Hi all, In this post we will see about how sitecore can be extended using packages and modules.

Let's Go,

Sitecore is an extensible application.you can extend sitecore functionality In the following ways,  
                                   1.Packages
                                   2.Modules

Sitecore Packages:

  • Created by the developers.
  • Used to transfer files between sitecore instances.Packaging items up in Sitecore is the easiest way to move things between environments
  • It’s a ZIP file used by sitecore installation wizard.
  • It also contains Serialized items.
  • Can contain code and configuration files.

Types:

  1. .Zip Packages - created through the Sitecore package designer. These can include both items and/or files.
  2. .Update Package - It also include both items and/or files. These types of packages were created by Sitecore to handle product and module upgrades, and are usually installed via the /admin/UpdateInstallationWizard.aspx utility page.

Sitecore Modules:

  • Most modules are sitecore packages.
  • It’s used to extend the sitecore functionality.
  • Found on the marketplace.

Creating a simple Package in sitecore

Creating a package in Sitecore is pretty simple.

Step 1 : Select the Package Designer from the start menu.(On Desktop => Development Tools => Package Designer)


Step 2 : This gives you a wizard that looks like the below image, which has a few details to fill in. Specify the package name,version and other details.


Step 3: On top of the dialog, Click Items Statically button =>Add Items that you want.
                    Click files Statically if you need files package.


Step 4: Now we’ve added the items, we just need to generate a zip from the package. Click generate Zip and download your package file.


Installing the Package: 

Packages can be installed using
                         1.Sitecore Instance manager
                         2.Sitecore Rocks
                         3.ControlPanel/Desktop

Now we going to see about third one Control Panel/Desktop method of installation.

Step 1: Select the Installation Wizard. (Desktop => Development tools => Installation Wizard)


Step 2: Then you’ll be asked to choose the package to install.Upload your package that need’s to be installed.


Step 3: Install the uploaded package and restart the Sitecore client.


Creating an Anti Package Using Sitecore Rocks:

Using Sitecore Rocks to create a package has many advantages including the ability to manage packages from Visual Studio . But the most important feature to me is the ability to create an Anti Package ( to undo installed functionality in case of any mistakes or errors).

Step 1 : From Sitecore Explorer in Visual Studio, right-click on any Sitecore item => Tools => Create Package.


Step 2: From the Package tab, locate Manage Packages and click on it.


Step 3: A Package Manager window will pop-up. Click on Anti Packages under your website's name.

Step 4: Click on Upload and Install button, upload your package and Install.


Step 5: Click on the Create Anti Package.this will create a Anti-Package for you.


Step 6: You're all set. This Anti Package can be installed to revert overwritten items or files to their current state and delete any added items or files.


Thanks for your Reading and also please share with your Friends. Happy Coding :)

Saturday, November 24, 2018

Sitecore Dictionaries

Hi All, In this post we will see about the use of dictionaries in Sitecore

Here you go,
  • When you are working in Multi language sites,you must know about the sitecore dictionaries.Because when you translate your site, some information cannot be translated(ex.static texts,Button text etc).To overcome this sitecore introduced a dictionaries.
  • Sitecore dictionaries are useful when you want to translate hard-coded texts(ex:button text)

You can find dictionary in the path

                         /Sitecore/System/Dictionary

Dictionary entry helps

                        1.Translating static content
                        2.Translating field names
                        3.Adding help text.


Dictionary Domain

  • Used for fallback mechanism(if certain key is not found then sitecore searches key in the fall back domain).
  • It’s defined in the site configuration.
  • Entries cannot be used for client translation.


Steps to add Dictionary entry

Step 1: Navigate System/Dictionary ,Right Click Add new dictionary Entry
             Note that the entry includes two fields
                          Key     - Unique key
                          Phrase- Value that replaces after translation.


Note :Do not use the keyname same as template field names. Because sitecore will automatically use the dictionary item to translate the fieldnames. Please refer below image the field name Home replaced by it’s key value raj.


Please refer above image the Home FieldName gets replaced.

Step 2: Refer your key in your page .
            Sitecore dictionaries available in the namespace: Sitecore.Globalization

                To refer a dictionary entry:

 @Sitecore.Globalization.Translate.Text("Home")


All now set.publish and value will be replaced after translation.

Translate By domain

                    Suppose if you have two different domains, sitecore also provides a facility to translate a text by domain.

Step 1: Add a new domain under system Dictionaries, based on the template(Sitecore/templates/System/Dictionary/Dictionary Domain)


Step 2: It’s simple, just change the API.

@Sitecore.Globalization.Translate.TextByDomain("mydomain","Home")


Sitecore Databases

Hi All, In this post we will see about databases available in sitecore.

Let's Move,

Sitecore have three types of databases
             
            1.Master
             2.Core
             3.Web

Master

The Master database is the authoring database - it contains all versions of any content or assets.
In order for visibility of your content in live site, you need to publish your changes.

Core

 The Core database contains
 Sitecore settings, as well as the tables containing the .Net membership provider (i.e. users/roles contained in the Sitecore repository)

Web

Contains published versions of Master database used to display the web site.
The Web database is only the latest published version, and the content that is driving the live web site.

Thanks for your reading, please share with your friends. Happy Coding :)

Check the users Logged into the sitecore backend

Hi, Today I'm going to discuss about " how to check the concurrent users logged into the sitecore backend ? ". For this ...